Task Management with Obsidian Projects
At work, we often find ourselves using task management software like JIRA or maybe one of the newer contenders like Monday. These products help us manage a large list of tasks being done by various people, on various teams, so that we can wrangle this complex process of software development. But what do you use when it is just you, but you still want to track the progress and issues related to your personal projects? Up until recently, I had been infrequently using a free licence for JIRA. I had tasks for the album I am writing in their JIRA cloud service, but because I wasn’t using it very often, they canceled my license. I could have paid them to keep it running, but I figured I would go searching for a lightweight alternative for managing my side projects. I love Obsidian for taking notes and use it daily. My favorite thing about it, is that my notes are just markdown files. I backup my notes using a git repository. Being that they are just markdown files, they play nicely with file diffing tools should I be trying to merge notes from two different sources (i.e. different computers). It is just a pleasure to use that application as one of my daily tools. So when I was looking for another task management solution, I wanted to find something similar to Obsidian, but for task management. I found one project that was basically what I wanted, but it was a small Github project that would require me to compile it from source, and I was hoping for an experience with an application that I could reliably assume would continue to receive updates. In the end, I found exactly what I was looking for, and ironically it came in the form of a Obsidian plugin.
Obsidian
Now if you don’t already have Obsidian, I am not going to go on at length in this post explaining what it is and why you use it. I definitely should do that some day, because I think it is something everyone should use. But the purpose of this post is to show you a simple task management solution for solo developers, not to rave about all the other features of Obsidian like being one of the best note solutions out there. I will just say, Obsidian is a markdown editor designed to make taking notes easy, maintainable, and portable. Like many applicaitons these days, it allows for plugins and has a large number of community contributed plugins available, including the Projects plugin I am discussing today. Obsidian is free for single users if you don’t want to use their cloud storage / mobile features. Just download the thing and try it out. Trust me, it will sell itself.
Getting started with the Projects plugin
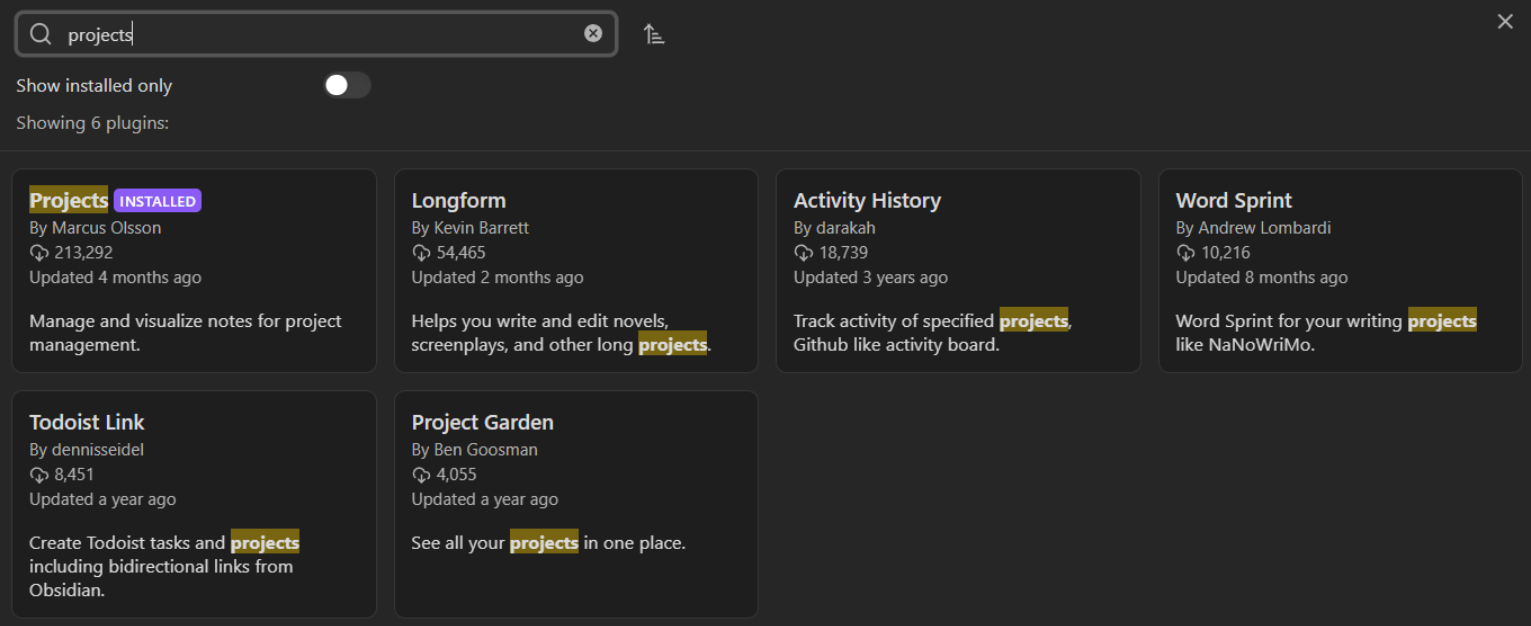
Now that I got that out of the way, let’s talk about the main attraction, Obsidan Projects. Like all of the Obsidian community plugins, the Projects plugin can be found going to Settings -> Community plugins -> Browse, and then searching for the word projects. The plugin we are looking for is called Projects, just the word by itself, and is published by Marcus Olsson.
Once you have installed the plugin, don’t forget to return to the Community plugins page in the Obsidian settings screen and enable the newly installed Projects plugin by clicking the toggle button on the far right.

Once you have enabled the plugin, the following icon will will appear in the tray on the left side of the Obsidian application:
![]()
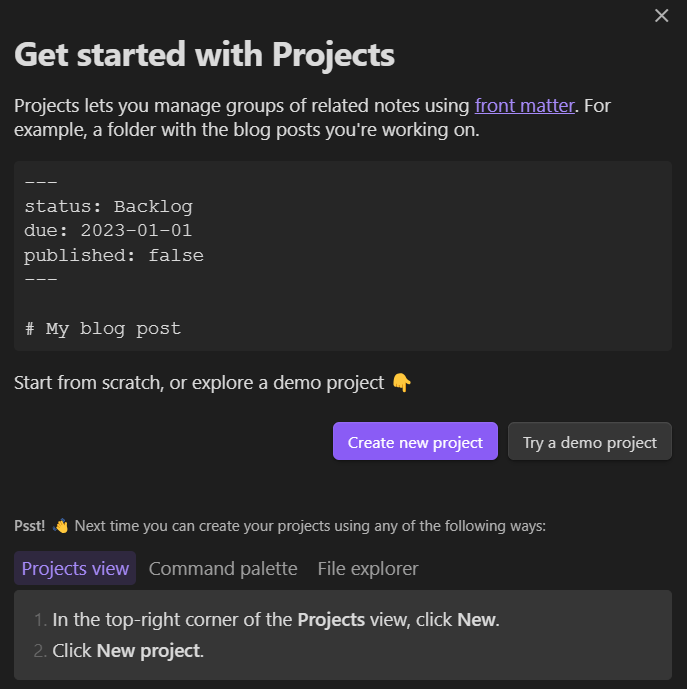
Clicking this icon will bring you to your new Projects plugin. When you open up Projects plugin for the first time, it gives you a Get started with Projects dialog. If you press, Try a demo project, it will create a folder within the root of your workspace, and put fake markdown files in it that represent 5 tasks to be done. The demo utilizes the Table, Board, Calendar, and Gallary features of the Projects plugin. If you would like to see a nice example of Projects in use, it is worth a click, given that it is as easy as deleting the Projects - Demo Project folder in your workspace when you are done playing with the demo.
I am going to assume at this point that you have clicked the Create new project button, either from the dialog above, or using the button that looks like a folder with a plus symbol on it inside the Projects tab. When you have done this, you will be presented with the following dialog:
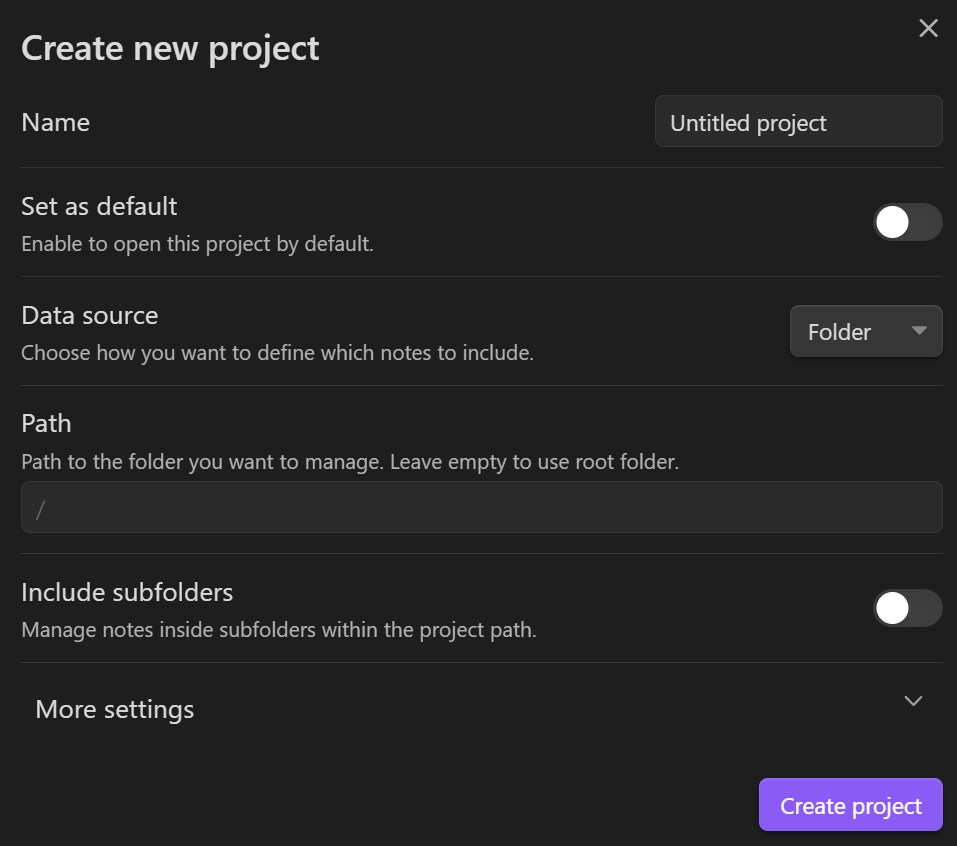
You can of course name your Project, which is what it will show up as in the project dropwdown box in the Projects tab. You can make it so that when you open up the Projects tab, it brings up this project by default, assuming you have created more than one project in your workspace. One of the interesting options is the Data source setting. You have three options: Folder, Tag, and Dataview. I won’t get into Dataview, as Dataviews are one of the more advanced features of Obsidian, and I am here to talk about simple solutions. I am not using Tag as my data source, but it is a good option if you want to target very specific documents in your tree of notes. Personally though, using Folder as my Data source was exactly the solution I was after, so that is what I will talk about today. I have a specific folder where I am keeping all my tasks, so I set the Path option to point to that folder, and I went ahead and set Include subfolders to true so that in the future I could organize the tasks however I like within that root “tasks” folder and they will still be picked up by the Projects plugin. One last thing of note here. There is a More settings panel that you can open up and access some additional settings. I also used a feature in here called Excluded notes, so that it would not count my “Index” pages as tasks. I put pages in most folders in my notes workspace that are basically a table of contents for that folder. That is irrelevant to talking about Projects, other than to say that because I have these documents every including where I am keeping my tasks, I used this feature to remove those pages from the project to keep it clean. You may have documents in your setup that are under the folder your project is utilizing, but you don’t want shown in Projects and this is how you do that.
Project Table
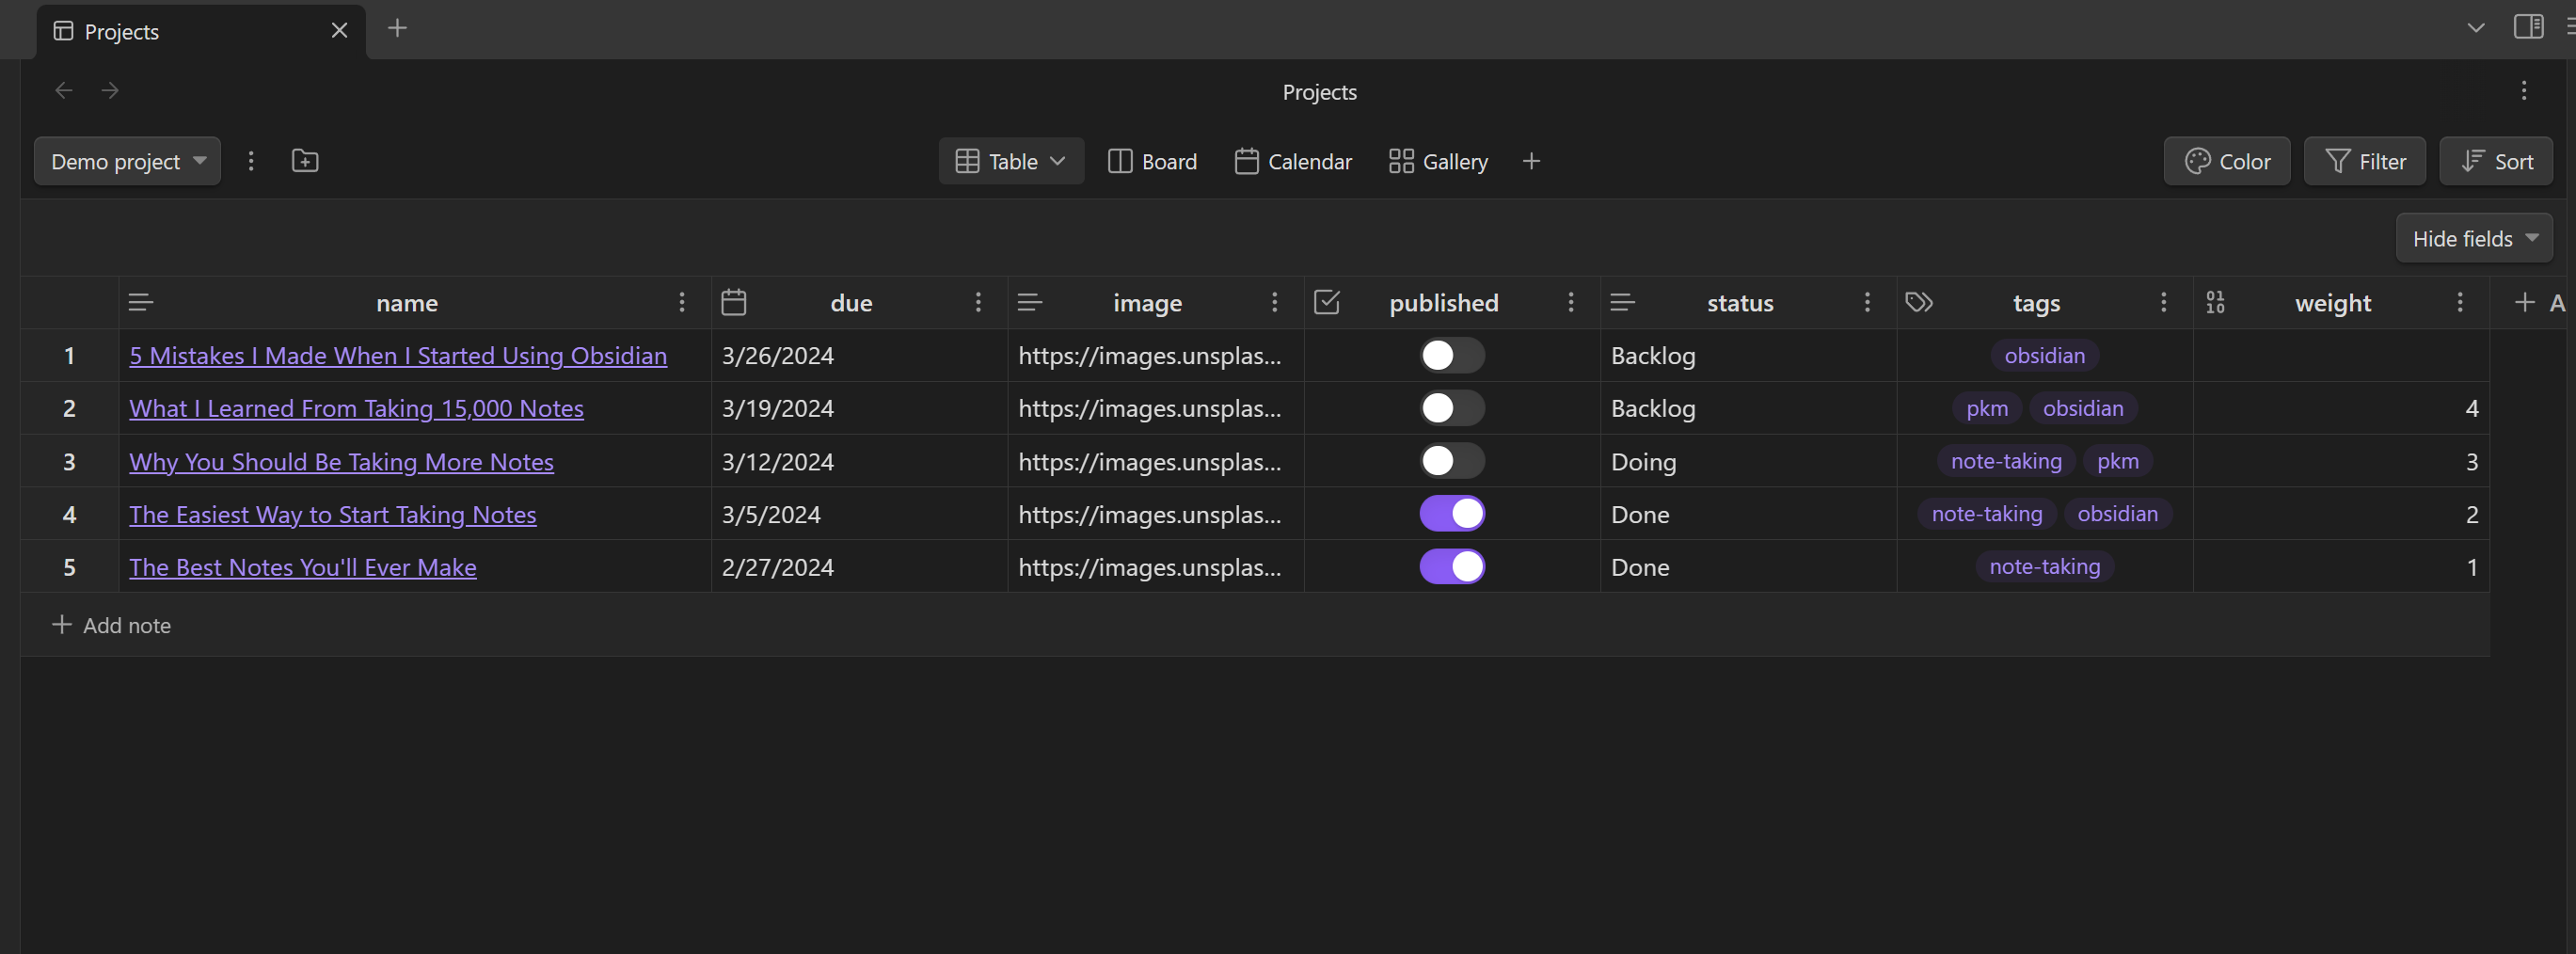
The Project Table is a table of Properties as Obsidian calls them. Properties are just the fields in the YAML frontmatter at the beginning of your markdown file. Each frontmatter field is a Property in Obsidian, and this Table view shows you the fields for each of the pages that are part of your project. You are able to hide fields that you don’t care to see. Each field heading has a 3-dot button that allows you to configure the field amongst other things. One thing this allows you to do is to take text fields you create and specify the valid set of values that should be used for that field, which is the called the Options feature, and is nice to utilize when setting field values from the Table view because it will provide you a dropdown with only valid options rather than allowing for the potential of mistyping the incorrect value. This is certainly a nice and useful view to be able utilize when you want to see all the frontmatter fields for each task all listed together.
Project Board
For me, the Board is one of the main reasons I want a solution like this.

The Board is essentially a Kanban board for your project. Towards the top of the interface, you will notice the Status field, which happens to be set to the status property assigned in each task’s frontmatter for this demo data. This name is arbitrary though, and you may use any field name you like for this. What it represents though is how you will be grouping each task on this board. In the example in their demo, they have 3 values for their status field: Backlog, Doing, and Done. You can use whatever values make sense to your process, and it does not need to be arbitrarily limited to just three choices. Just like in other task management applications, you can drag a task from one board column to the other, and this will change the field pointed to by the Status field setting to have the value that column represents. In other words. If you dragged a task from “Backlog” to “Doing”, it would set that task’s frontmatter status field to “Doing” without having to manually change the text of that field. By default, this page just shows the title of each task, but you can show whatever fields you want using the Include fields feature. Also from this screen, you can click the Add note button at the bottom of each column as an easy way to create a new note while assigning the specified Status field to the desired value.
Tasks
I basically already mentioned it, but I just wanted to make clear that tasks in this Obsidian Projects setup are just markdown files like all the rest of the notes in your workspace. There is nothing specially about them really, other than how they are used. You use the frontmatter section to store all the various kinds of information you might want to store against tasks or issues, just like you would with custom fields in your typical project management solutions like JIRA. The body of the markdown file is where you describe the task/issue/bug, and put whatever you like. If you want to break down this document futher into testing notes docs, and research docs, etc, they of course don’t need to even be in this project folder and you can link to those other documents from your task document just like you would any other note in Obsidian. They are just notes, with a nice UI and workflow for using them as tasks.
Where are these settings stored?
If you look at the folder you pointed your project at, you might wonder where it is storing things like the list of values that a field can have and which fields you want to show on your Table view. In an Obsidian workspace, you have a .obsidian folder. If you are in Windows and you have not specified to show hidden folders, this folder may be hidden to you in File Explorer because it starts with a period, and thus is marked as hidden. If you go into this folder, in the plugins folder from there, you will find the obsidian-projects folder, which holds the settings and logic for the plugin. You will want to check in this folder along with your tasks if you are using git to backup your notes / tasks, otherwise everytime you clone the repo, you will have to install and setup the Projects plugin even though your tasks will still be in the workspace.
Conclusion
And that is basically it. This might not be a good choice for a team, as you might imagine that it could get a bit messy trying to make this system work with a bunch of other people. You also want to have one source of truth for what tasks are being worked on, done, ready, etc and if you are checking this in to a repository, that gets a little messy as well in a team environment. But if what you need is a free solution that works great for the solo developer, this is really an option that you should consider. There are no servers to run. It is just simple text files presented through a nice user interface to form a simple task management system.